Adjusting a mountain bike derailleur involves fine-tuning the gears to ensure smooth shifting. It requires tweaking cable tension and limit screws to align the derailleur with the gear cogs. Proper adjustment prevents chain slipping or difficulty in shifting gears ensuring a more efficient and enjoyable ride on varying terrains.
Ready to conquer any trail with confidence? Discover the key to seamless rides: mastering how to adjust a mountain bike derailleur. Unravel the secrets to smooth gear changes and enhance your biking experience. Take the first step towards effortless shifting, unlock the know-how and elevate your biking game today!
Learning how to adjust a mountain bike derailleur can transform your riding experience. Stay tuned for easy, step-by-step guidance to fine-tune your bike’s gears ensuring smoother shifts and optimal performance on any terrain. Keep reading to unlock the secrets behind a well adjusted derailleur and elevate your biking adventures.
Understanding the Basics
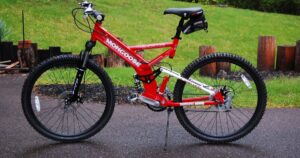
Mountain bikes, the go-to for off-road adventures, are designed for rugged terrains and thrilling trails. Understanding the basics of mountain bikes is crucial for a seamless ride. From their sturdy frames and suspension systems to specialised tires, these bikes are tailored for stability and control over challenging landscapes.
At the core of mountain bike basics lies the frame geometry, which determines handling and comfort. Suspension systems, whether front, rear, or both, absorb shock for a smoother ride over bumps and rocks.
Moreover the distinct tread patterns on mountain bike tires offer traction in diverse conditions, ensuring grip on loose gravel or muddy paths. Mastering these fundamentals opens doors to a world of thrilling rides and unforgettable outdoor experiences.
Tools Required
When it comes to tools for mountain bikes, simplicity is key especially when you need to change a mountain bike tire. Basic essentials like tire levers a multitool with Allen keys and a pump can be a game changer on the trail. These tools allow quick fixes for punctures, adjustments to brakes and gears, ensuring you stay rolling smoothly on your adventures.
For more intricate tasks like maintenance or major adjustments consider adding a chain tool, spoke wrench, and pedal wrench to your toolkit. These tools expand your capabilities, enabling you to tackle a wider range of repairs and keep your mountain bike in prime condition for those challenging rides.
Preparing Your Workspace

Before diving into mountain bike maintenance, setting up your workspace is crucial. Find a well-lit area with ample space to man our around the bike comfortably. Clear any clutter and lay down a clean mat or cloth to protect the bike and catch any small parts. Having essential tools nearby, like wrenches, screwdrivers, and lubricants, ensures a smooth workflow.
Creating an organised workspace primes you for a successful bike maintenance session. Gather all necessary tools and ensure a clutter-free, well-lit space. This preparation not only safeguards your bike but also streamlines the process, making it easier to focus on giving your mountain bike the care it deserves.
Assessing the Derailleur Alignment
Assessing the alignment of a mountain bike’s derailleur is crucial for a seamless ride. It involves visually checking the derailleur’s position relative to the gear cogs ensuring it’s parallel and properly aligned. Minor adjustments in alignment can significantly enhance shifting precision and prevent potential chain issues on your rides.
Observing the derailleur’s alignment might seem daunting, but it’s a fundamental step in optimising your bike’s performance. By understanding this process you’ll gain confidence in diagnosing and correcting misalignments, ensuring smoother gear changes and a more enjoyable biking experience overall.
Adjusting Cable Tension
Absolutely, here’s a simple table outlining the steps for adjusting cable tension on mountain bikes:
| Steps for Adjusting Cable Tension on Mountain Bikes |
| 1. Shift to the Smallest Gear: Begin by shifting the bike to the smallest rear gear and the smallest front gear. This releases tension on the cable. |
| 2. Locate the Barrel Adjuster: Identify the barrel adjuster on the derailleur or shifter. It’s usually found where the cable enters the component. |
| 3. Turn the Barrel Adjuster: To increase tension, turn the barrel adjuster clockwise; to decrease tension, turn it counterclockwise. Make small adjustments. |
| 4. Test the Shifting: Shift through the gears to test the adjustments. Ensure the bike smoothly shifts through all gears without skipping or hesitating. |
| 5. Fine-Tune if Necessary: If shifting isn’t smooth, make minor further adjustments to the barrel adjuster until the gears shift seamlessly. |
| 6. Lock the Cable: Once satisfied with the adjustments, ensure the cable is securely tightened to avoid slippage or excess tension. |
This table provides a quick overview of the steps involved in adjusting cable tension on a mountain bike, making it easier to follow along while performing the task.
Limit Screw Adjustments
- Prevent Chain Issues: Properly adjusted limit screws ensure the derailleur doesn’t overshoot the highest and lowest gears, preventing the chain from slipping off.
- Smooth Shifting: Correctly set limit screws facilitate precise gear changes, ensuring smooth shifting up and down the gear range.
- Enhanced Gear Durability: By preventing the chain from rubbing against the derailleur cage, these adjustments can prolong the lifespan of your gears.
- Improved Performance: Fine-tuning limit screws optimises the derailleur’s function, contributing to better overall bike performance.
- Reduced Noise: Eliminating excessive chain movement due to misaligned limit screws can significantly reduce chain noise during rides.
- Prevent Frame Damage: Limit screw adjustments help prevent the chain from falling off the cogs, avoiding potential damage to the bike frame or components.
- Ride Confidence: Knowing that your limit screws are properly adjusted provides confidence in your bike’s reliability, ensuring a more enjoyable ride on varied terrains.
Fine-Tuning with Barrel Adjusters
Fine-tuning with barrel adjusters on mountain bikes is a game-changer. These small but powerful knobs near the handlebars let you make on-the go tweaks to your bike’s shifting precision. Simply turn them clockwise or counterclockwise to dial in the derailleur’s cable tension, ensuring smooth gear changes without needing any tools.
Mastering the art of barrel adjusters empowers riders to optimize their bike’s performance instantly adapting to terrain changes effortlessly. Understanding how barrel adjusters work on mountain bikes is crucial for a seamless riding experience. They act as your on the-fly gear fine-tuners allowing you to make precise adjustments mid-ride.
By grasping their function and knowing how to use them riders can maintain peak performance throughout their journey, ensuring every gear shift is as smooth as the trail ahead.
Lubrication and Maintenance

Lubrication and maintenance are vital for keeping mountain bikes in top-notch condition. Regularly applying lubricant to the chain, gears, and pivot points ensures smooth operation, reduces wear and tear, and extends the bike’s lifespan.
Proper maintenance also involves checking tire pressure, inspecting brake pads, and cleaning the bike after rides, safeguarding against potential issues and ensuring a safe, enjoyable ride every time.Taking care of your mountain bike through proper lubrication and maintenance not only enhances its performance but also minimises the need for repairs.
By dedicating time to routine checks, cleaning, and lubrication, you’ll ensure your bike is always ready for thrilling adventures on challenging trails, allowing you to focus on the thrill of the ride without worrying about mechanical hiccups.
Troubleshooting Common Issues
Encountering hiccups on your mountain bike ride? Don’t fret! Troubleshooting common issues on mountain bikes is part of the adventure. From tackling chain slippage to addressing brake squeaks or gear misalignment, understanding these glitches opens doors to smoother rides.
Stay prepared by learning quick fixes for these issues; it’ll keep you pedalling confidently through rugged trails. Explore how to troubleshoot common problems and gear up to conquer any biking challenge that comes your way!
Remember, even the best rides may face bumps literally and figuratively. But with a bit of knowledge on addressing these common mountain bike issues, you’ll spend less time worrying and more time relishing the thrill of the trail. Dive into troubleshooting techniques and ensure your biking escapades are always on track!
Replacing Cables and Housing
Replacing cables and housing on mountain bikes is crucial for maintaining smooth gear shifts and responsive braking. Over time, cables can fray or housing may develop kinks, affecting performance. By replacing them regularly, you ensure optimal functionality enhancing your biking experience on diverse terrains.
This task involves removing the old cables and housing, installing new ones and adjusting tension for precise shifting and braking. Stay tuned for simple steps to efficiently replace cables and housing on your mountain bike allowing you to ride confidently without worrying about gear or brake malfunctions.
Replacing Jockey Wheels
- Enhanced Performance: Upgraded jockey wheels often come with smoother bearings, improving overall drivetrain efficiency and performance.
- Better Shifting: Newer jockey wheels can offer crisper and more precise gear changes, reducing chain skips or slippage.
- Durability: Replacing worn-out jockey wheels with higher-quality ones increases their lifespan and reduces the need for frequent replacements.
- Reduced Friction: Upgraded materials and designs can minimise friction, allowing for smoother rotation and less power loss.
- Noise Reduction: Quieter operation is a common benefit, especially with well-maintained and properly installed replacement jockey wheels.
- Compatibility Options: Different replacement jockey wheels might offer compatibility with a broader range of drivetrain setups, allowing for customization.
- Improved Riding Experience: All these benefits culminate in a more enjoyable and efficient ride, whether on trails or pavement, enhancing your biking experience overall.
Upgrading Your Derailleur
Absolutely, here’s a simple table to outline potential upgrades for mountain bike derailleurs:
| Derailleur Type | Features | Benefits |
| Basic OEM | Standard shifting capabilities | Affordable, easy replacement |
| Mid-range | Improved materials, smoother shifts | Better durability, enhanced performance |
| High-end | Lightweight, precise shifting | Superior performance, durability, efficiency |
| Wide-range | Accommodates wider gear range | Increased versatility on various terrains |
| Clutch-equipped | Improved chain tension | Reduced chain slapping, better stability |
This table outlines various types of derailleurs based on their features and benefits, ranging from basic OEM to high-end and specialised options like wide-range or clutch-equipped derailleurs, each offering distinct advantages for mountain biking enthusiasts looking to upgrade their gear
Compatibility Considerations

When it comes to compatibility considerations for mountain bikes, it’s crucial to match components for seamless performance. Check the compatibility between frame sizes and wheel diameters to ensure a proper fit and handling on various terrains.
Also, pay attention to the compatibility of suspension systems, drivetrains, and brakes to optimise the bike’s overall functionality and safety.Moreover, evaluating compatibility extends to accessories and add-ons.
Make sure any additional gear such as racks, water bottle holders or electronic devices fits your bike’s frame or mounting points securely. Prioritising compatibility guarantees a smoother and more enjoyable ride tailored to your biking needs and preferences.
Tips for Regular Maintenance
Regular maintenance is key to keeping your mountain bike in peak condition. Simple tasks like cleaning and lubricating the chain, checking tire pressure and inspecting brake pads regularly can significantly extend your bike’s lifespan. Additionally don’t forget to periodically tighten bolts, adjust gears and examine the suspension for smooth and safe rides on various terrains.
For efficient maintenance, consider creating a schedule to keep track of tasks and ensure your bike stays in top shape. Keep these tips in mind to maximize the lifespan of your mountain bike and enjoy consistent reliable performance during your adventures on the trails.
Safety Considerations
When it comes to mountain biking safety considerations are paramount. Riding trails on mountain bikes requires proper protective gear like helmets gloves and knee pads to shield against potential falls or obstacles.
Additionally understanding the terrain and trail difficulty ensures a safer ride allowing riders to anticipate challenges and adjust their speed and technique accordingly. Mountain bikes themselves play a crucial role in safety especially when equipped with components like Eagle Transmission a sturdy build specialized tires, and responsive brakes designed to navigate rugged landscapes.
Checking the bike’s condition before hitting the trails ensuring brakes, suspension and tire pressure are in optimal condition adds an extra layer of safety promoting a secure and enjoyable mountain biking experience.
FAQS
What tools do I need to adjust a mountain bike derailleur?
Basic tools like a screwdriver, Allen wrenches, and cable cutters are usually necessary. A bike stand or some way to suspend the bike can also be helpful.
How do I know if my derailleur needs adjustment?
Signs include chain skipping, difficulty shifting gears or the chain not sitting properly on the cassette or chainrings.
Can I adjust the derailleur without experience?
Yes, basic adjustments can be made with some guidance. Online tutorials, manufacturer’s guides, or seeking help from a bike shop can assist in learning the process.
What are the common adjustments needed?
Tensioning the cable, aligning the derailleur with the gears, and setting the limit screws to prevent the chain from falling off the cassette or chainrings are typical adjustments.
How often should I adjust my bike’s derailleur?
It depends on usage and terrain. Generally periodic checks, especially after rough rides or when noticing issues with shifting, are advisable to maintain optimal performance.
Conclusion
Mastering how to adjust a mountain bike derailleur is a game changer for any rider. It’s not just about the gears it’s about control efficiency and the sheer joy of a smooth ride. With the right knowledge and a bit of practice this crucial skill opens up a world of confident biking experiences whether tackling steep trails or cruising through scenic paths.
So, take the time to understand this essential aspect of bike maintenance; it’s the key to unlocking the full potential of your mountain biking adventures.Remember adjustments might seem daunting at first, but as you delve into the process and familiarise yourself with the nuances, it becomes second nature.
Don’t hesitate to explore online tutorials or seek guidance from seasoned bikers or local bike shops to fine tune your skills. The journey to becoming a proficient bike mechanic starts with mastering how to adjust a mountain bike derailleur, empowering you to enjoy every ride to the fullest.